Visual Wonders with CSS: The Art and Science of Web Styling

The key to success is consistency
CSS (Cascading Style Sheets) is like a magic wand for websites. It takes basic pieces of a webpage and turns them into something cool and attractive. It's a special language that lets designers change how things look on a webpage. CSS makes a soothing and simple visual experience on the website. With CSS, you can decide on colors, fonts, spaces, and where things go on a page. So, it's like giving a webpage style and personality.
Connect HTML with CSS
There are three different ways to connect your HTML file with CSS.
Inline: we can apply inline CSS to any HTML tag using the "style" attribute.
 <h1 style="color:red;">A Red Heading</h1>
 <p style="color:pink;">A pink paragraph.</p>
Internal: we can also put the "style" inside the head tag and that's called internal CSS.
 <!DOCTYPE html>
 <html>
 <head>
     <style>
         body { <!-- this makes the entire body greenyellow color -->
             background-color: greenyellow;
         }
         h1 { <!-- every h1 tag is blue now -->
             color: blue;
         }
         p { <!-- every p tag is red -->
             color: red;
         }
     </style>
 </head>
 <body>
     <h1>This is a heading</h1>
     <p>This is a paragraph.</p>
 </body>
 </html>
There's one problem here. We are applying the styles in every h1 tag or every p tag. What if we want to add styles to a specific line? For that, we need to use class or id. We'll learn about it later in this section.
External(recommended): There's another way to add CSS in a much cleaner way. In this method, we need to create a separate ".css" file and we need to connect the file to our HTML like this:
<html>
<head>
    <title>My Website</title>
    <link rel="stylesheet" href="css_file_path.css">
</head>
    <body>
        <h1>This is a heading</h1>
        <p>This is a paragraph.</p>
    </body>
</html>
Now we can write the CSS tags on a separate file like this:
body {
    /* this makes the entire body greenyellow color */
    background-color: greenyellow;
}

h1 {
    /* every h1 tag is blue now */
    color: blue;
}

p {
    /* every p tag is red */
    color: red;
}
Comment
/* this is a single line comment */

/* this is a
    ...multi
        ...line
             ...comment */
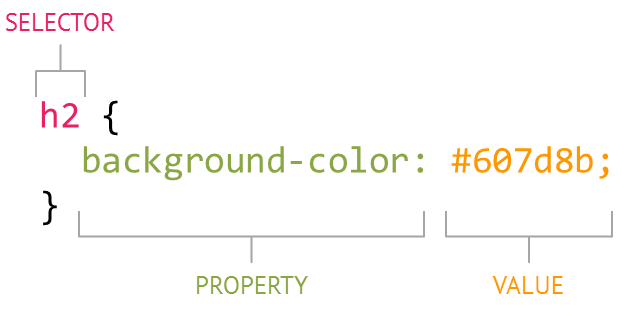
The range of CSS properties to learn is limitless. However, we should focus on mastering the most commonly used ones. If we ever need more, we can easily find them by searching on the internet.
Let's learn some of the most commonly used CSS properties! Don't forget to practice it on your own. Remember if you don't write the codes by yourself you won't learn fully.
h1 {
    color: red; /* text color is red now */
    color: #FFFFFF; /* we can also use hex color code like this {search -> hex color code to know more} */
    background-color: blue; /* sets the background color blue */
    text-align: center; /* we can align the text with this. Also there's -> center,start,end */
    font-size: 18px; /* font size is 18pixel */
    font-weight: 800; /* font is extra bold */
    /*
        Font Weight Meaning:
            thin - 100
            extraLight - 200
            light - 300
            normal - 400
            medium - 500
            semiBold - 600
            bold - 700
            extraBold - 800
            black(Heavy) - 900
    */
    border: 1px solid green; /* sets a border on every side of green color, we can use dotted/dashed/double instead of solid */
    /* we can also set the border explicitly like this */
    border-top: 1px dashed aqua;
    border-bottom: 1px double goldenrod;
    border-left: 1px outset wheat;
    border-right: 1px inset olive;

    /* we can also set the visibility */
    visibility: hidden; /* content invisible but it will also take it's space */
    visibility: collapse; /* invisible and it won't take any space on the layout */
    visibility: visible; /* default value */

    /* we can set the opacity from 0 to 1, which will make it from transparent to full opaque*/
    opacity: 0.25;


}

body {
    /* let's see some background related properties */
    background-image: url("image_path_link"); /* set a background image */
    background-repeat: no-repeat; /* let the image appear only once */
    background-color: #cccccc;
    height: 500px; /* set a specified height */
    width: 500px; /* set a specified width */
    /* we can also use % instead of px */
    height: 50%;
    background-position: center; /* Center the image */
    background-size: cover; /* Resize the background image to cover the entire container */
    border-radius: 10px; /* rounds up the border */
    background-image: url("image-link.jpg"), url("second-image.jpg"); /* set two background image */

}
We can also set the padding and margin of any element. Let's first understand the layout.
h1{
    margin: 20px; /* all four sides margin */
    margin: 20px 50px; /* TopBottom - RightLeft */
    margin: 10px 50px 100px; /* Top - RightLeft - Bottom */
    margin: 10px 30px 60px 120px; /* Top - Right - Bottom - Left */

    padding: 20px; /* all four sides padding */
    padding: 10px 40px; /* TopBottom - RightLeft */
    padding: 10px 30px 80px; /* Top - RightLeft - Bottom */
    padding: 10px 30px 70px 120px; /* Top - Right - Bottom - Left */

    /* we can also set the margin or padding explicitly
        only left/right/top/bottom side */
    margin-left: 10px;
    margin-right: 10px;
    padding-top: 10px;
    padding-bottom: 10px;
}
Great Job! We learned the most commonly used CSS properties!!
Now do you remember we faced a problem? we're applying the CSS in every h1 tag or in every p tag. What if we don't want that?
Let's learn selectors. In CSS, selectors are patterns used to select the elements you want to style.
1. Universal Selector: It's an asterisk(*) symbol means applying the style to all elements.
* {
    margin: 0;
    padding: 0;
}
2. Class Selector: Same class can be used in multiple elements. We use the class selector when we want to give the same style to multiple elements. On the CSS side if we want to access a class we need to write the class name starting with a dot(.). We can also use multiple class names and access them separately like the "font-big" class used below.
<!DOCTYPE html>
<html>
<head>
    <style>
        .primary-color{
            color: aqua;
        }
        .font-big{
            font-size: 40px;
        }
    </style>
</head>
<body>
    <h1 class="primary-color font-big">This is a heading</h1>
    <h3 class="primary-color">This is small heading</h3>
    <p>This is a paragraph.</p>
</body>
</html>
3. ID Selector: Unlike the class, we can't use id on multiple elements. ID is unique and can be used only on a tag or element. To access an ID in CSS we need to use hash(#)
<!DOCTYPE html>
<html>
<head>
    <style>
        #primary-color{
            color: aqua;
        }
        #secondary-color{
            color: aqua;
        }
    </style>
</head>
<body>
    <h1 id="primary-color">This is a heading</h1>
    <h3 id="secondary-color">This is a small heading</h3>
    <p>This is a paragraph.</p>
</body>
</html>
Grouping Selectors
/* we can use multiple selectors using comma */
p,h1,.font-customize {
    /* this is a rgba color code, search any color online
                    to know it's hex code/rgba code */
  background-color: rgba(189, 183, 107, 0.476);
  width: 50%;
}
button,li, #color-customize {
  color: indianred;
}
Congratulations!
You successfully completed the basics of CSS. There's much more to know about CSS. I'll be here to support you throughout this journey and in the future we'll learn more about something called CSS framework which will make our life much easier to style. If you want to learn by yourself I'll add some resources at the end.
MDN Web Docs - CSS: MDN Web Docs - CSS
W3Schools - CSS Tutorial: W3Schools CSS Tutorial
Codecademy - Learn CSS: Codecademy CSS Course
CSS-Tricks: CSS-Tricks
Every CSS Properties: W3Schools